
Because there is a lifetime of things to learn about working with wood, we'll cover the basic stuff, emphasizing how it relates to American Walnut, our chosen species.
Let's walk through my construction process and cover any "science" as we get to new problems. Unlike welding, which I don't dare jump into the argument of what makes a good weld, woodworking has a few rules that are pretty solid. There are a thousand and one techniques and joints and tools and power or non arguments, but in the end, they all get the same result.
I'm pro power tool and for this top I was fortunate to meet a craftsman of renowned skill who kindly lent me the use of his table saw, jointer and thickness sander, but his experience and beer. Emphasis on the last part. That being said, yes I cheated. This blog is about more with less, use what you got, etc. etc. But it doesn't hurt to know guys with cool tools and you happen to be a homebrewer..
Moving ON....
Wood Selection and Buying
I suggest buying the wood for the table top at a smaller, local lumber mill/yard. You will have a tough time finding walnut or cherry wood at your local Home Depot. Not only will you find exotic woods, you'll also probably find a guy that can talk knowledgeably about them and can help you choose a species and mill finish that works with what you have.
Mill Finish is an important word that you hopefully caught and was like all, "What What??, What is mill finish??" In these shops, you'll see some wood that is relatively smooth on all sides, has one edge jagged, maybe with bark on it (like the first pic) or just rough all around. Then you'll see cryptic notations in the price sheet about S4S, S3S, NS etc. Don't fret - these notations refer to how many Sides have been Surfaced. S3S will have the "top", "bottom", and one thin edge milled flat, and square to each other. Be sure to check the squareness!!
 |
| Typical milling annotations. |
If you don't have the equipment to mill, or cut, a rough board down to the final size, I suggest buying the S4S lumber. It should be mostly flat and ready for glue up to make the table top. There's one caveat - you're also going to pay for all of the shavings and sawdust it took to get that board to it's nice clean state. Pros buy rough lumber and dimension it themselves to save money. I suppose I'm in the middle and bought the S3S so I only had to rip the edge off of one side.
Lastly, take a tape measure with you to the lumber yard. The wood they have on stock is not dimensioned. The board will have random widths depending on the tree's natural shape. S4S boards will have been milled to remove exclusions and produce the flattest surface possible. With that said, most S4S lumber is of the same thickness and width. Just don't chance it.
Don't forget to add in the "kerf" - the thickness of wood lost when cutting it.
Moisture Content
When you bring your new lumber home and just want to sit down and watch the game, don't just drop it on the concrete slab of your garage! OK, I'll lean it up against the wall. NO! The wood will absorb the moisture from the concrete and swell up, bow, twist and make you angry. This is easy to fix - use stickers. Funny word, but essentially just a piece of scrap wood between the floor and lumber to allow air to circulate. I tend to place them every two feet.
If you're out of horizontal room and want to lean that board against the wall - I don't recommend this either. If left long enough the wood will sag under it's own weight and give you a nice bow - even though it's not your birthday! Straight up and down, or leaning the "hard" way (where the second moment of inertia is greatest!).
The second part of moisture content is in trying your best to stabilize it to prevent wood movement.
Wood Movement
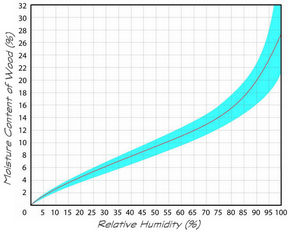
Boy oh boy. This one is a can of worms. If you browse through an antique store you are likely to see an old dresser with a huge split in the top - a result of the carpenter not allowing for wood movement. The top tried to move with a change in relative humidity but was constrained by the jointery, causing the piece to split. As one would expect - the wood expands when the moisture increases and vice versa. The big dimensional changes occur when the "bound" water evaporates from the cell walls, causing them to shrink. The "free" water is all of the other water that generally gets removed in the drying process. Here's a chart showing roughly how relative humidity and moisture content are related:
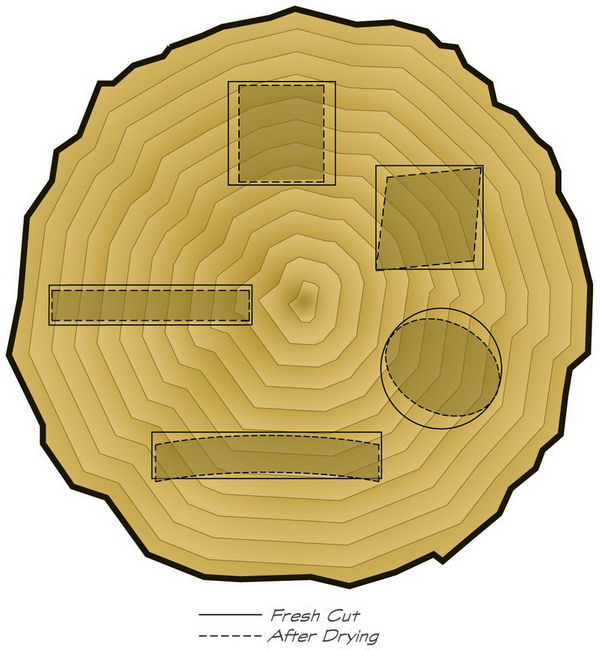
Most of your big box store lumber is cut like the bottom rectangle - or plain sawn. (The cupping occurs because the side furthest away from the center of the tree [heart] has more tangential grain showing - which shrinks faster - than the radial grain - which shrinks more slowly.) The lumber is cut this way because it yields more boards per tree. The cut line on the left of center in the above picture represents a quarter-sawn piece of lumber. It is more dimensionally stable across its width than plain or flat sawn lumber. Why? Because the radial and tangential grain "types" are the same on both sides of the board.
There's hope for figuring this all out. Surprise, surprise; there's an app for that. I use the tool at WoodWorkersResource for estimating wood movement. It's especially important for this project because we need to know how much of a gap to leave around the wood. Because the top is bound by the much stronger steel, if it swelled it would bow up and crack at the joints.
Last but not least: the wood can also move because of internal stresses such as knots and heartwood/sapwood junctions and more. It can take a while to factor it all in, but fortunately for us, you can read a lot about it all and get a head start on learning. Start with this detailed report on wood movement during the drying process.


Whew - that's a lot of work to get this far. I'm going to wrap this one up because writing about gluing wood together could fill a book and this post is getting long already. There's a lot to getting the top flat when you are gluing something up - and extra care needs to be taken if you don't have fancy stuff like planes and thickness sanders. Sorry for the title teaser.
That's the easy part in understanding wood movement. The second piece of the pie is board selection. Where and how the board was cut from the tree can determine how much it will move. If you don't know where your lumber came from, this pictorial might help:
There's hope for figuring this all out. Surprise, surprise; there's an app for that. I use the tool at WoodWorkersResource for estimating wood movement. It's especially important for this project because we need to know how much of a gap to leave around the wood. Because the top is bound by the much stronger steel, if it swelled it would bow up and crack at the joints.
 |
| Should have read the blog.. |
Ripping the Stock
Depending on what you bought you'll need to rip the stock down to size. In my case I needed to rip the rough edge off. I was less concerned with the width of the individual boards and more concerned with maximizing the board width. This step is best completed with a table saw, however... you can use a hand ripping saw... I got lucky and had access to a jointer and squared the edges of the boards to the faces. Just take note and accommodate your cuts if you want equal sized boards or not. Don't forget to accommodate for any jointing waste as well. Don't forget to brush your teeth. Don't forget to....
Don't fret if you don't have a jointer. Most table saws cut fairly squarely and if not you can use a shooting board and a hand plane. The reason for this step is just to minimize any kind of gap/glue joint in the table top.
Last step is to (if it's needed) ensure that the boards are all the same thickness. If you bought S4S or S3S they should be close enough for government work. If not, use a thickness planer or a hand plane and some muscles.
You should end up with something like this:
Pro tip: Cut them rough length before jointing/planing/ripping. It just makes them a little easier to handle than a 10' board.
Layout
Once the boards are ripped and rough cut to length (~24") lay them out on your frame to determine which sides you want up. Take note that it's best to alternate the ring direction (cup up - cup down - cup up etc.) This will help to mitigate any warping. Google it.
Whew - that's a lot of work to get this far. I'm going to wrap this one up because writing about gluing wood together could fill a book and this post is getting long already. There's a lot to getting the top flat when you are gluing something up - and extra care needs to be taken if you don't have fancy stuff like planes and thickness sanders. Sorry for the title teaser.
Keep up the good work, it's almost a table now!
No comments:
Post a Comment